Just discovered kibitz today via my automated whatis login script and it's amazing. According to the manpage it "allows two people to interact with one shell". Well, my team gave it a shot today when doing some pair programming and it worked out fantastically.
For example, say I want to share a terminal with user "adam" to get his advice on editing the Apache config on host "sidewinder". Once I and the user adam have a terminal session on sidwinder, I execute "kibitz adam". Then Adam sees the following on his screen:
Message from jesse@sidewinder on pts/1 at 11:00 ...
Can we talk? Run: kibitz -3330
EOF
Then Adam acknowledges by typing "kibitz -3330" in his terminal. After the acknowledgement, my side of the connection executes a new shell to share with Adam and from that point forward on we are both seeing the same terminal.
Kibitz is simple to use and it's a native utility on my Linux distributions. Just bummed it took me this long to find it. Linux keeps getting cooler and cooler...
Friday, September 4, 2015
Friday, May 1, 2015
Increasing Your Sphere of Influence
Influencing change is as much about (if not more) selling yourself as it is about selling an idea. But to be heard, people have to be listening. This is why building up your credibility within the organization is critical. Doing this takes time and dedication, but eventually you will find it is easier to influence changes in your organization.
Really what we're talking about here is building and strengthening relationships. You need to invest in relationships whenever possible, which should be all the time. Consider this as an example:
You have a conversation with a person and it goes well. You've both agreed on a problem, discussed possible solutions, and decided on primary and maybe secondary solutions. You both leave the conversation feeling like your ideas and suggestions were heard and taken into account when deciding on a solution. After this conversation, your credibility with that person probably went up, and in turn, increased your sphere of influence.
In contrast, if the conversation was mostly one sided, and you decided on the solution without much input or consideration of the other person's ideas, your credibility likely dropped with this person. Future interactions with this person may start off in a negative position based on past experience.
The rate at which you gain or lose credibility when interacting with a person depends on the significance of the conversation, the frequency of interaction with that person, and the overall feeling that the person leaves with. Never let a conversation with a person end in a negative way. If it ended poorly, try to make amends immediately. Most often this can result in a positive experience even when the initial conversation didn't go all that well.
Here are some other ways to build relationships:
The second part of influencing change is selling an idea. In my experience, I've been most successful when I've showed someone why a solution was better. Create a proof-of-concept and do a demo. Here's one of my favorite quotes about influencing change:
“You never change things by fighting the existing reality. To change something, build a new model that makes the existing model obsolete.” - Richard Buckminster Fuller
Another key point is to be collaborative when designing a new solution or solving a problem. People are more receptive to change if they feel they've actively been a part of it. This also provides an opportunity to look at the solution from new perspectives and identify potential issues.
When proposing change, keep in mind that you can't always win everyone over at once. Work off of the 10/80/10 rule:
Building Relationships
Really what we're talking about here is building and strengthening relationships. You need to invest in relationships whenever possible, which should be all the time. Consider this as an example:
You have a conversation with a person and it goes well. You've both agreed on a problem, discussed possible solutions, and decided on primary and maybe secondary solutions. You both leave the conversation feeling like your ideas and suggestions were heard and taken into account when deciding on a solution. After this conversation, your credibility with that person probably went up, and in turn, increased your sphere of influence.
In contrast, if the conversation was mostly one sided, and you decided on the solution without much input or consideration of the other person's ideas, your credibility likely dropped with this person. Future interactions with this person may start off in a negative position based on past experience.
The rate at which you gain or lose credibility when interacting with a person depends on the significance of the conversation, the frequency of interaction with that person, and the overall feeling that the person leaves with. Never let a conversation with a person end in a negative way. If it ended poorly, try to make amends immediately. Most often this can result in a positive experience even when the initial conversation didn't go all that well.
Here are some other ways to build relationships:
- inviting others to eat lunch with you, never miss an opportunity by eating alone
- establish a carpool, lots of time of previously unused time to bond
- offer assistance with issues that aren't your responsibility, shows you care about more than your problems
- attend/host team outings
Selling an Idea
The second part of influencing change is selling an idea. In my experience, I've been most successful when I've showed someone why a solution was better. Create a proof-of-concept and do a demo. Here's one of my favorite quotes about influencing change:
“You never change things by fighting the existing reality. To change something, build a new model that makes the existing model obsolete.” - Richard Buckminster Fuller
Another key point is to be collaborative when designing a new solution or solving a problem. People are more receptive to change if they feel they've actively been a part of it. This also provides an opportunity to look at the solution from new perspectives and identify potential issues.
When proposing change, keep in mind that you can't always win everyone over at once. Work off of the 10/80/10 rule:
- Influence the 10% who are innovative and receptive to change first. These people are already driving the company forward, so they are most likely open to new ideas.
- Next, with the support of the first 10% influence the middle 80%. This group of people are open to new ideas, but are also comfortable with the way things are. Show them why the new idea is better.
- After that success, there will be significant momentum and most of the remaining 10% (the naysayers) will be pulled into the fold.
Friday, April 3, 2015
How We're Crushing Technical Debt
How it all started
Year after year we'd been placing things on our yearly goals that just weren't getting done. And the list kept growing. That left us feeling like we weren't accomplishing anything at the end of the year during review time. Huge morale killer. It's not like were weren't busting our asses all year; we were always busy. We just never made time with everything else going on to work on reaching our goals. We were too busy fighting fires, or we never had the focus for what was next in line.
This year we decided to change that pattern. After a bit of trial and error, we came up with a system that has been paying dividends. With this new workflow we've paid down more technical debt in the past three months than we've done in probably the past two years.
How did we do this? We stopped trying to do everything and let some stuff fall on the floor.
But what we noticed over time, is that all we had managed to do was move our inbox workflow to KanBan (which was good for tracking), but we weren't making any real progress on knocking out the items on our backlog. We were just treading water and dealing with requests as they were coming in.
Then, late last year, a few of us started brainstorming about how to solve the backlog issue. What we decided to do is split up the team.
The Product Backlog holds our work that has not yet started. The Tech Debt team pulls all new work from the Prioritized Backlog column, which is groomed routinely by senior leaders and management. Because of this constant grooming, at any time a member of the Tech Debt team is able to go this location and pull in the next highest priority item. The Not Yet Prioritized column is normally empty, but as new requests or ideas emerge, they go here for sorting.
The Work In Progress board is used on a daily basis. New items that have been pulled from the Product Backlog board are placed into the Sprint Backlog column and then broken up by he team into individual tasks that are needed to accomplish the overall goal. Each of those tasks are taken by a team member one at a time, worked through to completion or to a blocked state, and then eventually moved to the completed column.
Every Monday, we hold a demo session with the Tech Debt team, the Systems Support team, and middle management to share what we've done. Once each item is accepted by the whole team, it's moved to the Accepted by PO column where management uses the data for reporting and then archives it.
When prioritizing items in our backlog, our default ordering routine is to sort things by the importance to the business, then importance to other teams, and lastly the importance to our team. We typically place the needs of other teams in front of our own. There are exceptions, but it's our general rule.
We have many items towards the bottom of the backlog that will likely never be completed due to the fact that they aren't big problems, and other new required work will get bumped up in front of them. That's okay. We want to work on what's most important to the whole IT system. We figure that if those items at the bottom become important enough, they will bubble up to the top.
We have also discovered psychological benefits to the new system. Before, we had so much context switching going on that our heads were spinning. Priorities were always changing and the team never had a clear feeling of what to do next. Now, since the backlog is an ordered list that is routinely groomed, there is rarely a question of what is the most important thing to do. It's liberating.
This year we decided to change that pattern. After a bit of trial and error, we came up with a system that has been paying dividends. With this new workflow we've paid down more technical debt in the past three months than we've done in probably the past two years.
How did we do this? We stopped trying to do everything and let some stuff fall on the floor.
Evolution begins
A few years back we started using KanBan. Specifically, we're using the SaaS solution from LeanKit. If you're new to KanBan, The LeanKit folks have a write up you can read here. When we adopted KanBan, we saw an instant improvement in our workflow. It was amazing. Things were getting done, you could see what everyone was working on, and you got a good sense of the team's accomplishments at the end of the week when we moved all of the completed cards into the archive. We felt like we'd made a breakthrough, and we had. Our work was organized and throughput was high.But what we noticed over time, is that all we had managed to do was move our inbox workflow to KanBan (which was good for tracking), but we weren't making any real progress on knocking out the items on our backlog. We were just treading water and dealing with requests as they were coming in.
Then, late last year, a few of us started brainstorming about how to solve the backlog issue. What we decided to do is split up the team.
The next stage
We started by splitting the team in half into two new teams: Systems Support and Tech Debt. Turns out this ratio worked for us, but if it hadn't we could have easily rebalanced the team members. The Systems Support team takes care of all of the normal day care and feeding. That's dealing with systems issues, processing new support requests, etc. The Tech Debt team pulls its work from a new KanBan board we created that contains all of our backlog items. The new workflow for the Tech Debt team blends the KanBan and Scrum methodologies into something that works for us. Here are a few screenshots to show our board layout: |
| Tech Debt Team Product Backlog Board |
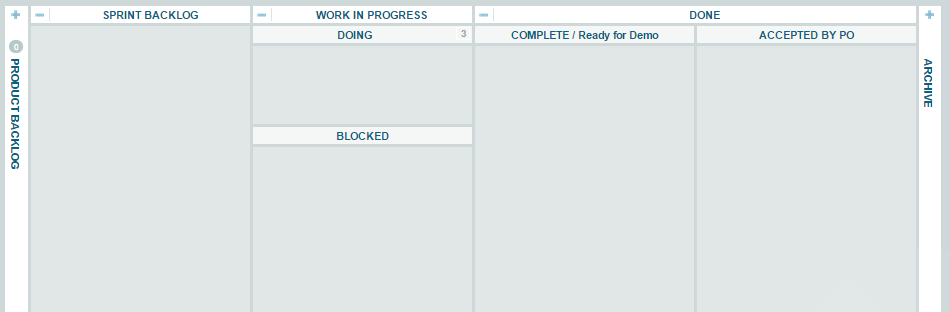 |
| Tech Debt Team Work In Progress Board |
Every Monday, we hold a demo session with the Tech Debt team, the Systems Support team, and middle management to share what we've done. Once each item is accepted by the whole team, it's moved to the Accepted by PO column where management uses the data for reporting and then archives it.
A few things we learned along the way
You might find that it's not possible to split up your team so you can get started. If that's the case, try and peel off one person first. Have that person focus on automating or delegating some of your team's work. Enough so that you can free up a second person, and then maybe another. It depends on your team's size and dynamics. Once you feel like your team is sized appropriately, get to work on knocking out the technical debt.When prioritizing items in our backlog, our default ordering routine is to sort things by the importance to the business, then importance to other teams, and lastly the importance to our team. We typically place the needs of other teams in front of our own. There are exceptions, but it's our general rule.
We have many items towards the bottom of the backlog that will likely never be completed due to the fact that they aren't big problems, and other new required work will get bumped up in front of them. That's okay. We want to work on what's most important to the whole IT system. We figure that if those items at the bottom become important enough, they will bubble up to the top.
We have also discovered psychological benefits to the new system. Before, we had so much context switching going on that our heads were spinning. Priorities were always changing and the team never had a clear feeling of what to do next. Now, since the backlog is an ordered list that is routinely groomed, there is rarely a question of what is the most important thing to do. It's liberating.
Friday, January 16, 2015
Automated F5 Configuration Backups
I've been using F5 LTMs for years, and a while back I decided to create a script to automate the configuration backup. Today I added that backup source code to my GitHub account to share the love for anyone that's interested.
Here's the overview of what it does:
1. Connect to each device, create a .ucs file, download the .ucs file and the bigip.conf file
2. Removes local .ucs files older than 30 days
3. Commits bigip.conf files to Subversion
4. Send notification email if any errors are encountered
The script has the following requirements:
* List of F5 LTM IP addresses that you want included in the backup
* SSH key-based authentication established for each target F5 device
* Email address to recieve alerts when backups fail
* SVN repository to hold the backups (this could be converted to git fairly easily)
Its been running flawlessly for me for several years now. Check it out and let me know what you think.
Tuesday, April 15, 2014
Cookbook Development Process
UPDATE: We've migrated away from VirtualBox and Minitest in favor of Docker, Chefspec, and Serverspec. Most of the workflow below is still relevant, but I'll be posting a more detailed update at a future date.
After a few recent conversations I've had, I realized that it may be helpful to share our current Chef cookbook workflow with the community. It works well for us and I'm pretty proud of how far it's enabled us to come. That said, if you have any detailed suggestions on how to make it better, let me know.
After a few recent conversations I've had, I realized that it may be helpful to share our current Chef cookbook workflow with the community. It works well for us and I'm pretty proud of how far it's enabled us to come. That said, if you have any detailed suggestions on how to make it better, let me know.
Source Code Management
We use Git (Gitolite fronted by GitList) to house all of our
cookbooks. Each cookbook has its own dedicated repository. We create branches for
all new development, merge to master after peer code reviews are completed, and
use tags to designate successful codelines (more on this later).
Development Suite
Our cookbook development suite includes CentOS, Test-Kitchen, Vagrant, VirtualBox, Berkshelf, Foodcritic,
chef-minitest handler, Veewee to create custom box images, and RVM with dedicated gemsets for each cookbook.
Development Methodology
Integration testing, code promotion
Our testing suite is based on the fail-fast methodology, which means we execute the cheapest tests first (time wise and computationally). This reduces the feedback loop on the easy stuff and frees up our test systems to spend more time in the Test-Kitchen phase, which is the most costly.
We opted to use Jenkins to perform the testing because it's free, and frankly, it's awesome. Each Jenkins job checks out the code for the target cookbook and executes the same build job. It does this via a bash script that we wrote. The script is kept in its own Git repo and is checked out during each Jenkins build. This allows us to change the testing logic across all of the jobs from a single place, and allows us to track changes to the script over time. Feel free to check out the script and use it if you like. You can get a copy here. The script does the following:
Cookbook linting:
Test-Kitchen:
- Cookbook grammar checking, coding standards. (Spaces vs Tabs, etc)
- Verify that each cookbook dependency is version locked in metadata.rb
- README.md formatting (for example: Jenkins build job URI)
- Berkshelf Berksfile opscode reference
- Foodcritic validation
- Execute the "berks" command to verify that all cookbook dependencies are indeed pulled from our local Git repo instead of the Internet
Test-Kitchen:
- This is where we see if the cookbook executes cleanly and if the minitest suite passes
This completes the testing phases. At this point, we know that the cookbook passes. What we do next is my favorite part.
Code Promotion
We now retrieve the version of the cookbook we are testing from the metadata.rb file. With that version number, we check to see if there is currently a tag in the related Git repo with that version as the name. If the answer is yes, then that concludes the Jenkins job.
However, if the tag does NOT exist, we create a new tag based on the current code, and upload the cookbook and all of its dependencies to the Chef Server (note that when Berkshelf uploads the cookbooks, it only uploads cookbook versions that do not already exist on the Chef Server). And, since we version lock all of our cookbook dependencies, there is no risk of the new cookbook being accidentally rolled out to nodes. It's just ready for future use.
·
All Jenkins cookbook jobs are triggered on code commit, and are also scheduled to build every Tuesday morning. The scheduled build on Tuesdays helps us catch changes that occur in the Ruby world that could negatively affect our build system. We implemented the scheduled builds after one day when we needed to make a change in our infrastructure and found out that cookbook builds have been broken for two weeks because of a broken Ruby dependency/environment issue.
Development Process
Below are the specific steps we use to develop cookbooks. I've included a flowchart at the end to give you a visual on the process.
Identify new cookbook requirements
Review the list of requirements for this cookbook. If this cookbook is replacing an existing configuration, document each requirement that will need to be migrated. Verify that all proposed requirements are achievable.Check community site and local repo for existing cookbook
Visit the Opscode Chef Community website and local Git repo and search for an existing cookbook that may already cover some or all of the documented requirements. If such a cookbook exists, use that one in conjunction with a wrapper cookbook to apply our company-specific settings, if any.Run the automated cookbook initialization script
You must pass the cookbook name at the end $COOKBOOK\_NAME. This script performs the following:- Accepts a single argument (cookbook name)
- Creates the cookbook via the berks cookbook command
- Creates a ruby gemset with the same name as the cookbook (this isolates each cookbook and allows us to experiment with new features without compromising the integrity of the entire development environment)
- Creates a default Gemfile
- Executes bundle install
- Creates a default .kitchen.yml
- Creates a default README.md, based on our standard format
- Initializes a new local Git repo, adds all the new cookbook files to the repo, and then performs an initial commit
curl -L https://raw.githubusercontent.com/jmauntel/cookbook-init/master/cookbook-init.sh | bash -s -l $COOKBOOK_NAME
Create the new cookbook repo on the Git server so you have a place to store your code
Update README.md
Include description, dependencies, requirements, test cases, and author sections.
Commit your code and push to the Git server
git add .
git commit -a -m "First pass at README.md"
git remote add origin git@git.acme.com:chef-cookbooks/${COOKBOOK_NAME}.git
git push origin master
If the repo does not yet exist, perform this step as soon as possible.
Create minitest logic to test the first requirement
In your cookbook directory, update `files/default/tests/minitest/default_test.rb`. Examples can be found here.
Boot the first kitchen instance / validate test failure
In most cases you should use the default-centos-6.3 image as your initial testing system, however the full list of available images can be listed by executing `kitchen list`.
kitchen test default-centos-6.3 -d never
Update the cookbook recipe to satisfy the first requirement
Resource documentation and examples can be found on the Opscode documentation site. You can also reference other cookbooks in your Git repo.
Retest cookbook with Test Kitchen
In your cookbook directory, execute the following:
kitchen converge default-centos-6.3
In your cookbook directory, update the appropriate recipe (default is `recipes/default.rb`)
Lint cookbook with Foodcritic
In your cookbook directory, execute the following:
foodcritic -f any . && echo PASS || echo FAIL
Rebuild & test cookbook from scratch
In your cookbook directory, execute the following:
kitchen destroy && kitchen test default-centos-6.3 -d never
Destroy Test Kitchen instance
If all tests pass, destroy the instance executing the following:
kitchen destroy
Commit code, push to Git server
git add .
git commit –a –m "New feature passed"
git push origin master
Create a Jenkins job for the cookbook
I can go into this step in more detail, if anyone is interested.
Update the version number in metadata.rb
In your cookbook directory, update `metadata.rb` with a new version number, following SEMVER standards.
Add all files to local git repo, perform commit, push to Git server
In your cookbook directory, execute the following:
git add .
git commit –a –m 'First functional version of cookbook'
git push origin master
Monitor the Jenkins job
If failures are found, refactor the cookbook.

Thursday, February 27, 2014
Improve Test-kitchen Performance
At my current gig, we've automated our cookbook testing with test-kitchen and integrated it into Jenkins. This was all fine and good until we started to get concerned with how long our testing was taking, given that many of our .kitchen.yml files include multiple platforms and multiple test suites. Because of this, some of our tests have as many as 8 systems to build so we can test all of the variations, and a single change would result in a 90 minute feedback loop. That's WAY too long.
So I started doing some investigating into what was taking so long and I discovered that our Vagrant systems were swapping heavily during Chef runs. That's when I discovered that Vagrant uses 256MB of memory as the default setting for it's instances. That lead me to add in the following parameter to all of our .kitchen.yml files:
- name: centos-6.5
driver_config:
box: centos-6.5
box_url: http://imagesource.acme.com/centos-6.5.box
customize:
memory: 1024
This simple change in the .kitchen.yml file decreased 90 minute test runs to 25 minutes!
Command-line Kung Fu
I recently stumbled on an article on Lifehacker that suggested a way to learn Linux commands in-line with your daily systems administration. Basically, it calls for adding a string of commands to your .bashrc file that randomly selects a command from various bin directories and executes a whatis on them.
I thought it was brilliant, but when I went to try it I was bummed to find out that the shuf command is not shipped with the base distribution of CentOS, which is the primary OS I support. Because of this, I decided to spin my own version of the hack that will work on CentOS.
# RANDOM COMMAND-LINE KNOWLEDGE
# List of bin directories that include commands you'd like to learn
binDirs='/bin /usr/bin /usr/sbin /sbin'
# Count the number of commands in $binDirs and randomly select a number in the range
randomNum=$(expr $RANDOM % $(ls $binDirs | wc -l))
# Based on the selected $randNum, select the corresponding command
randomCmd=$(ls $binDirs | head -${randomNum} | tail -1)
# Lookup the command with whatis and display the results
echo "Did you know that:"
whatis $randomCmd | sed 's/^/\t/g'
The hack isn't perfect because not all commands have an entry in the whatis database. When this happens, you will see a response similar to this:
Did you know that:
numastat: nothing appropriate
But, this doesn't happen all that often, and with this hack, I've discovered some awesome commands like watch.
Did you know that:
watch (1) - execute a program periodically, showing output fullscreen
Subscribe to:
Posts (Atom)